
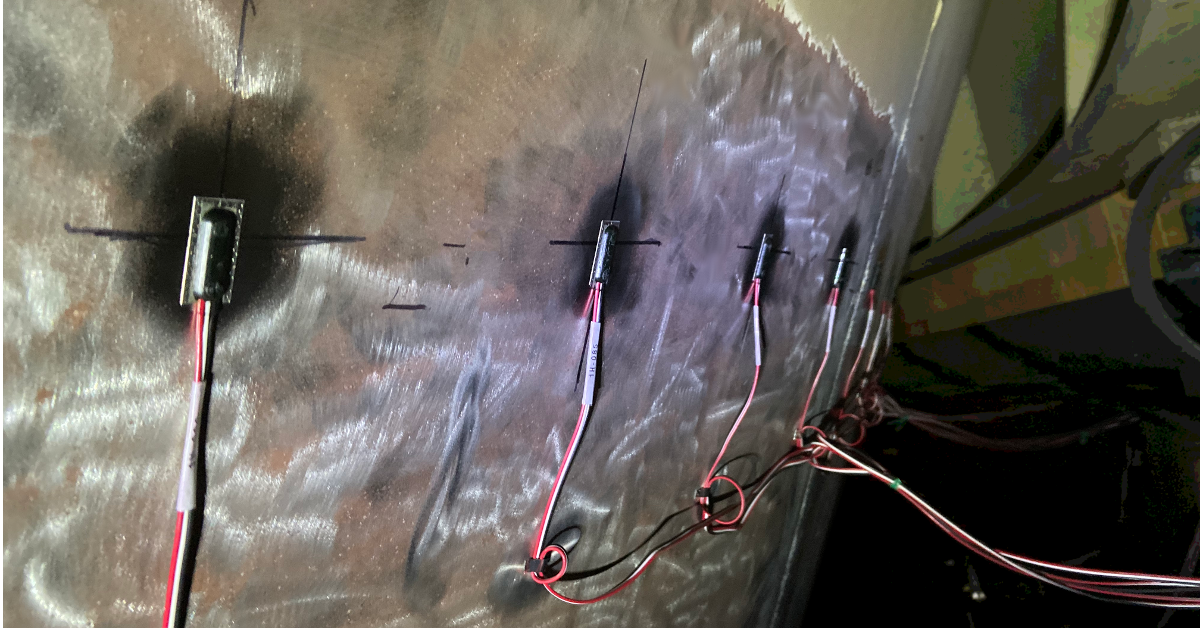
When it comes to measuring structural stresses and load, every application is unique, and sometimes that means using a different solution. In some cases where strain gauges are applied, it can be advantageous or even necessary to use weldable strain gauges instead of chemical bonding the strain gauges to the specimen.
Since many epoxies used to chemically bond strain gauges require specific heat and pressure for curing, it can be difficult or even impossible to use this method on large or irregular structures. Weldable strain gauges offer an advantage in this situation as they eliminate the need to clamp and cure any epoxies for bonding. In addition, weldable gauges can be installed in a variety of environments and weather conditions which offers additional advantages over traditionally bonded strain gauges. Although weldable strain gauges are applied differently, they function in much the same way as their bondable counterparts.
To properly install a weldable strain gauge, you will need:
- Proper PPE
- Weldable Gauges
- Straight Edge
- Scribe, Pen or Marker
- Degreaser
- Grinder
- Grinding Pads
- Sandpaper
- Spot Welder
Always remember to have the proper safety equipment on hand, such as eye protection and gloves, as well as any PPE required by your environment.
When installing a weldable strain gauge, you must first prep the area. Unlike bondable gauges, the area does not need to be polished to a fine degree. Simply degrease the gauge area, sand down any paint, coatings or excess debris and ensuring the area is purely metallic and free of chemicals is enough. A clean metal surface is important to the welding process.
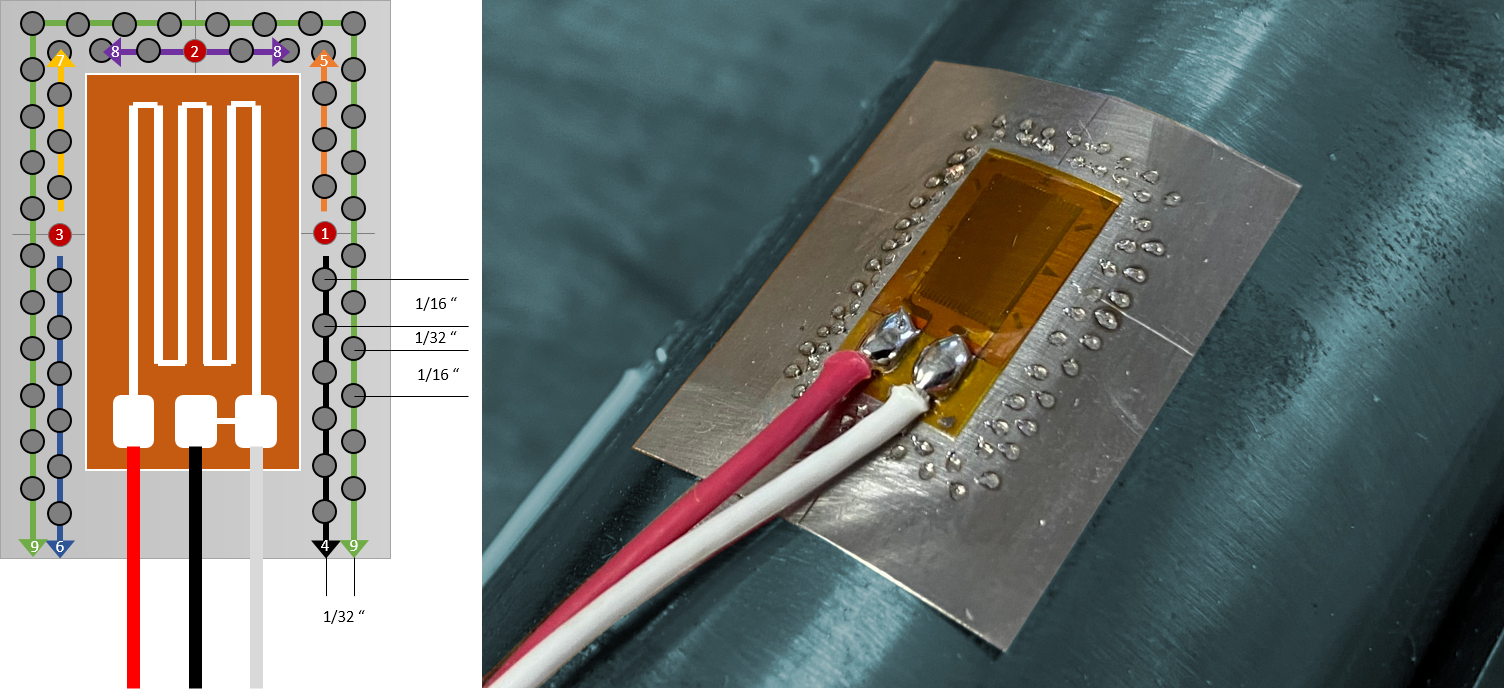
After the part has been cleaned, you can position the gauge. Most weldable gauges come marked so you can align the grid properly. When the gauge is properly aligned, spot weld the gauge on either side of the gauge along the centerlines, to hold it firmly in position and prevent shifting as the gauge is welded further. Once secure, the gauge should be welded all around the carrier surface, as illustrated below.
Recap:
- Clean the area to be bonded (Remove all paints, coatings, residue and debris until the surface is smooth).
- Mark center-lines for the gauge location with scribe and straight edge.
- Place the gauge on the part, lining up the center-lines.
- Spot weld the gauge on each line, to secure it in place.
- Weld the entire perimeter of the gauge in the pattern shown above.
For more information about our strain gauging and testing services, contact Ryan Welker @ (844) 837-8797 x702.
Related Links
Have a strain measurement challenge? Talk to the engineers who install gauges in the field every week.
Related solutions
Strain Gauge Services
Precision strain gauge installation — bondable and weldable — in the lab or in the field. Explore →
Testing Services
Structural and component testing that turns strain data into validated designs. Explore →
Sensing Services
Sensor selection, installation, and measurement services for demanding environments. Explore →
Recent insights
-
Precision Cable Harness Fabrication at ITM — Milford, Ohio
How ITM’s people and engineering depth deliver aerospace-grade harness quality, faster and more efficiently. Test System Harnesses, Engineered End-to-End Test system cable harnesses are the connective tissue between a test article and the data acquisition system that records it — strain gauge lead wires, sensor cabling, signal-conditioner runs, and DAQ interconnects. Whether the article is…
-
 AWS IoT Analytics, cDAQ-9189, Channel Synchronization, CompactDAQ, Condition-Based Maintenance, Edge-to-Cloud High-Channel Datalogging, Engineering, Instrumentation, iTestSystem, iTestSystem Automated Analytics, iTestSystem Notification Service, NI-9236, NI-9469, Strain, Stress, structural health monitoring
High Channel Count Synchronous Datalogging
When a manufacturer needed to validate the structural performance of a 38-ton on-highway vehicle, ITM deployed a 200+ channel synchronous datalogging system capable of capturing accelerometer, strain, GPS, and speed data at nearly 2 kS/s per channel…
-
 120 ohm strain gage, Instrumentation, iTestSystem, NI-9237, strain gauge, Strain Gauge Installation Service
A Look Back and Forward at 120-ohm Strain Gauges
Here at Integrated Test & Measurement, we love diving into the nuts and bolts of how things work. While setting up a project using 120-ohm strain gages with the NI-9237 module, I found myself reflecting on the history and technical reasons why 120 ohms became the original standard for strain gages. As it turns out,…