
LabVIEW Channel
A series of blog posts related to building efficiencies in LabVIEW. Our programming team will share past insights, lessons learned, and explore new programming concepts. This will be a sand box of sorts with a focus on solving problems using LabVIEW.
iTestSystem 20 Coming Soon!
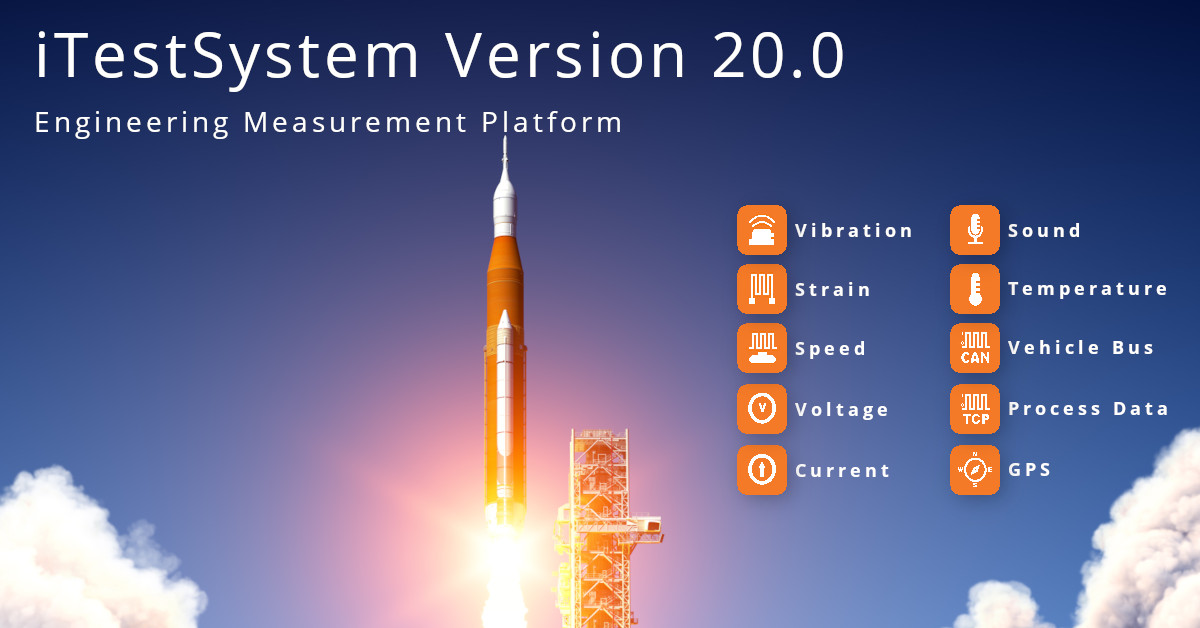
Coming Soon! iTestSystem 20.0
When: January 2022
The latest version of ITM’s engineering measurement software platform will make gathering data easier and more affordable than ever.
For more information about iTestSystem, contact Chase Petzinger at (844) 837-8797 x704 or via email at chase.petzinger@itestsystem.com.
LabVIEW Channel: Splitter Bars
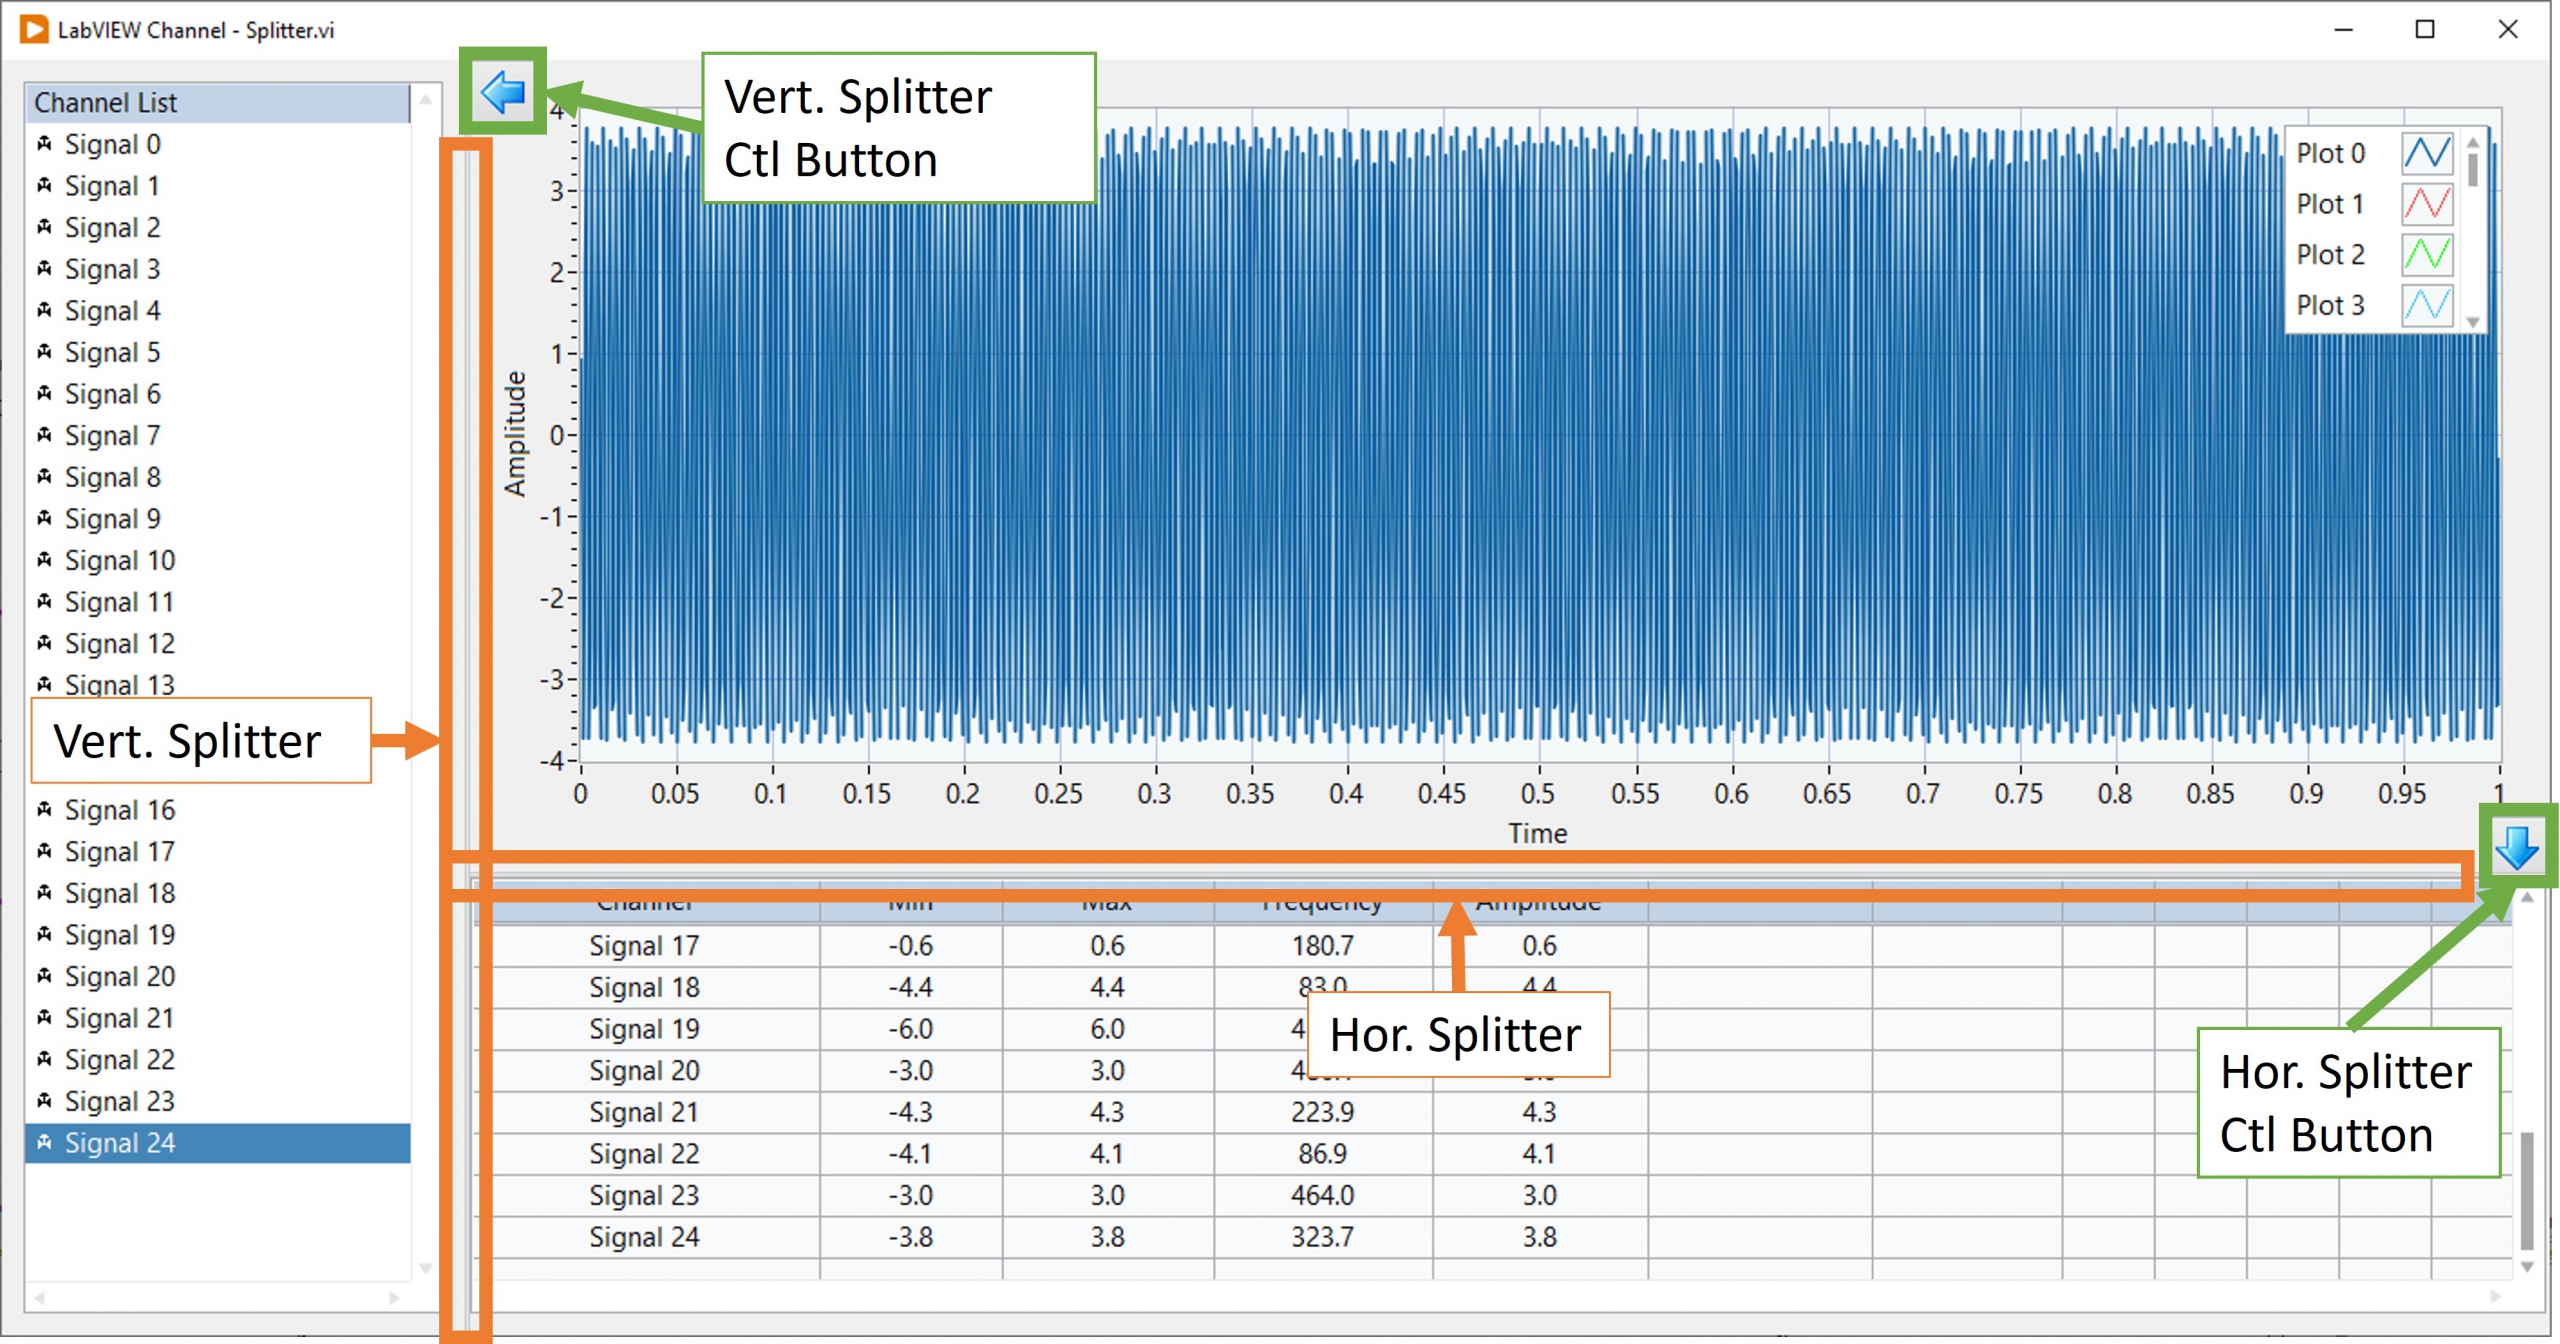
Figure 1: Example LabVIEW Front panel with Splitter Bars
In some of my earlier LabVIEW channel blogs I showed how to use a subpanel to build scalable module user interfaces. This blog describes another front panel layout tool for creating professional scalable user interfaces – the splitter bar. Splitter bars allow the user to resize the adjacent panes while an application runs. NI explains the functionality of configure of splitter bars here.
The labVIEW example described below shows how splitters can be moved programmatically to create clean professional user interfaces. This VI contains five (5) controls/indicators and two (2) splitter bars on the front panel. A listbox is used to select which channels are displayed in the graph, while a table displays each channel’s statistics. Each splitter bar’s position is controlled by a radio button containing two buttons (left and right for the vertical splitter and up and down for the horizontal splitter). When a splitter control button is initially pressed, its respective splitter bar snaps to the edge of the window and hiding the listbox or table. When pressed again, the respective splitter moves back to its original position revealing the listbox or table.
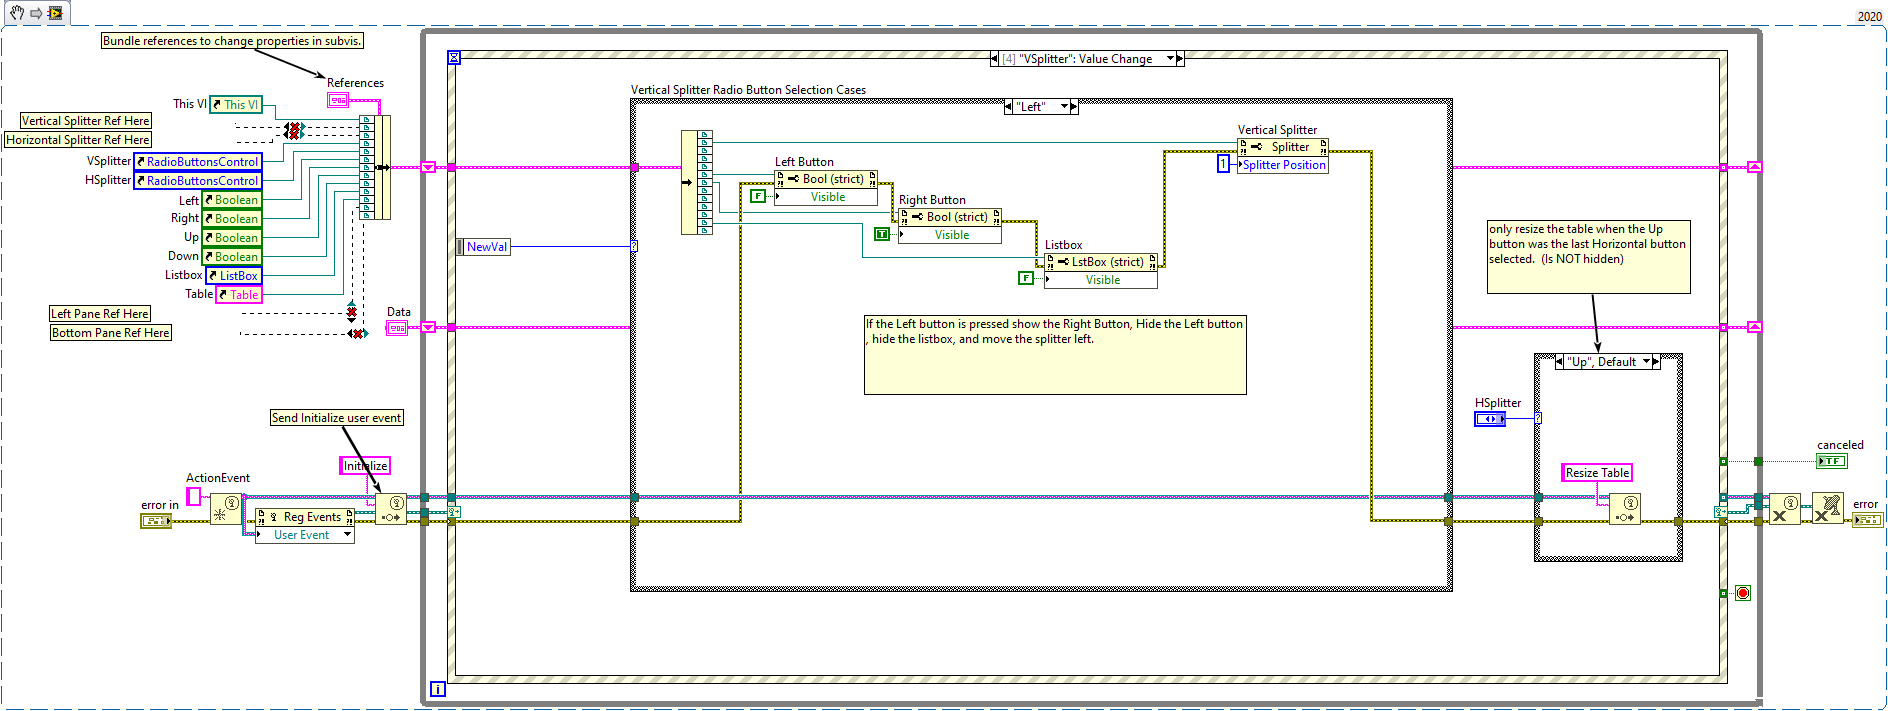
Figure 2: Programmatically move splitter bars.
Try the LabVIEW snippet above to see the splitter functionality. When you drop this snippet into a new VI, you will have to add vertical and horizontal splitters to the VI. See figure 1 for a reference for where to place the splitters. Right click on the splitter to get a reference to each splitter, left pane and bottom pane to run the VI. Wire these references into the appropriate bundle function. Set the graph to scale with panel. Do not set the listbox and table to scale with pane.
For more information about this splitter example, or our LabVIEW programming services contact Mark Yeager @ (844) 837-8797 x7041. You can also email me at mark.yeager@itestsystem.com if you would like me to send you the example vi or download it here.
LabVIEW Channel: Sorting Cluster Arrays
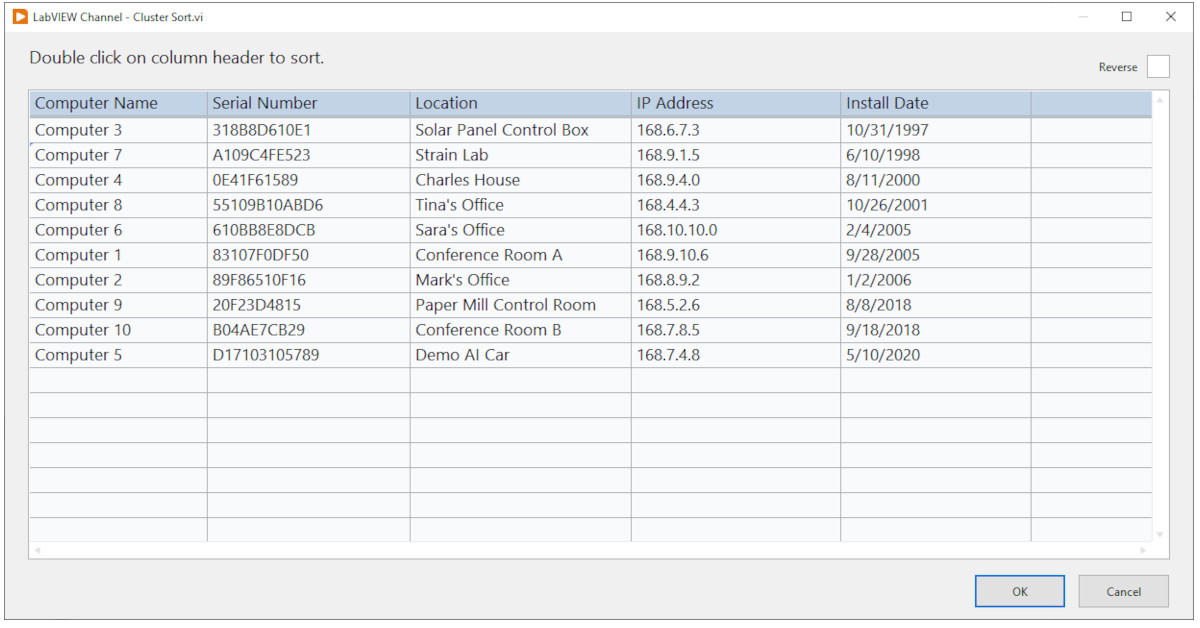
Figure 1: Table with Sortable Columns.
Our LabVIEW programmers are often asked to build user interfaces to interact with configuration settings, data sets, file metadata, and databases. Some examples of these interactive interfaces include, sorting data by parameters, plotting the top ten vibration peaks from a data set, or searching through data files for strain channels that exceed standard limits.
In LabVIEW, these types of data sets can be represented on the block diagram as an arrays of clusters. A cluster is a LabVIEW data type that groups data elements of mixed types. A cluster is similar to a record or a struct in text-based programming languages. An array is a group data elements of the same type. An array consists of elements and dimensions.
The VI shown in Figures 1 & 2 contains a table that is sorted when you double click on a column header. The VI snippet in Figure 2 contains the VI with subvis removed.

Figure 2: Sortable Table VI Snippet
The VI snippet in Figure 3 contains some example array cluster sorting examples. By Default A cluster is sorted by the first element and if there is a match the second element is used and so on. To control the sort priority, unbundle the elements you want to sort by then bundle them back above the original cluster. This new cluster can then be sent to the Sort 1D array VI.
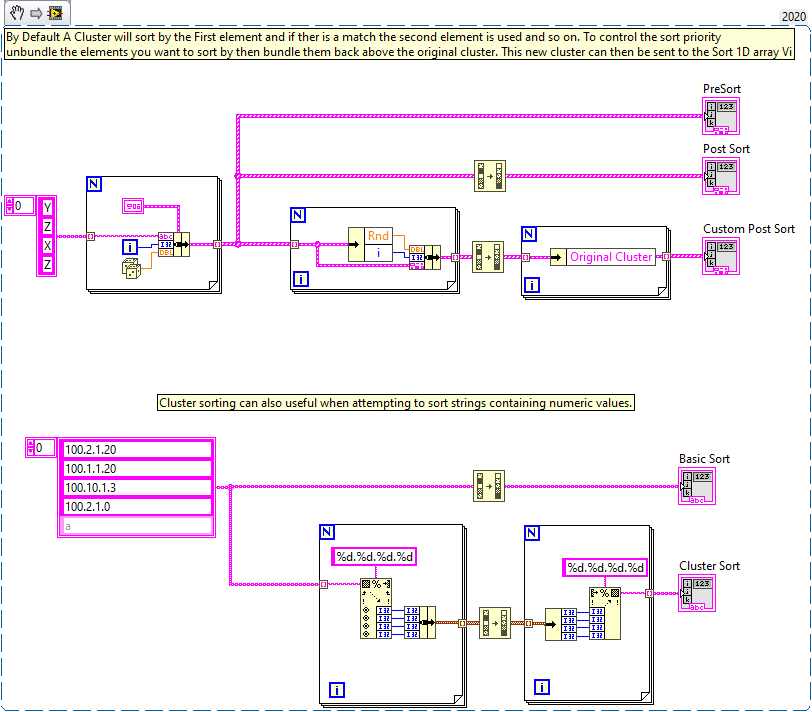
Figure 3: Sort Cluster Array Examples VI Snippet.
For more information about interacting with large data sets in LabVIEW, or our LabVIEW programming services contact Chase Petzinger @ (844) 837-8797 x704.
LabVIEW Subpanel
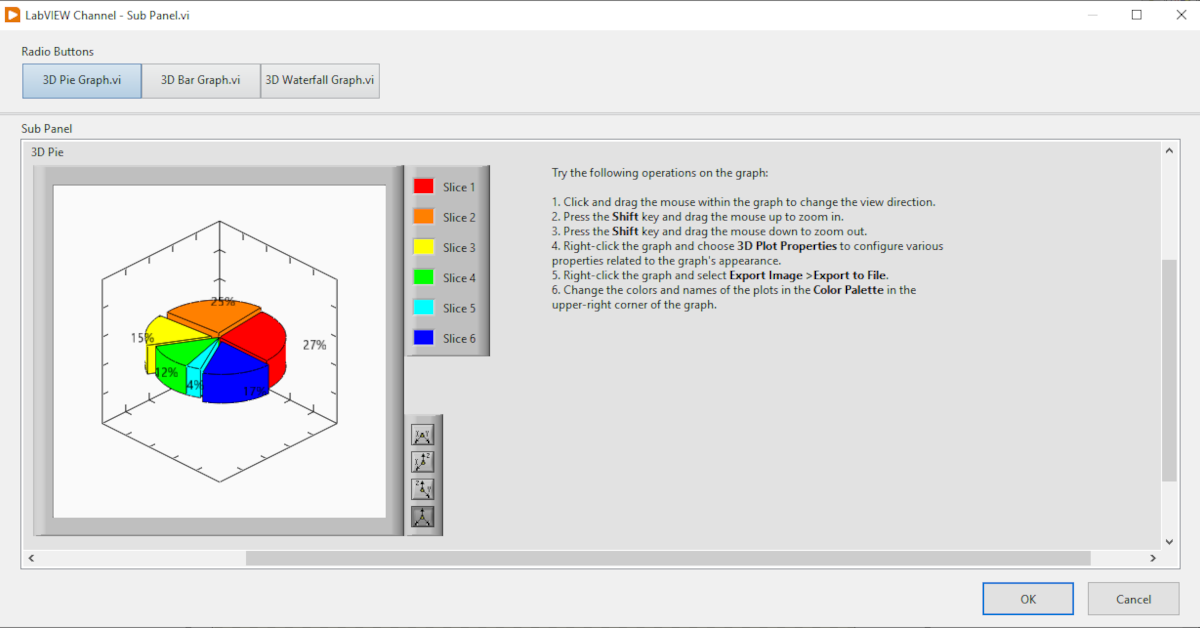
Figure 1 – Radio Button control of VI insertion into subpanel.
One control combination that our LabVIEW development team uses to build modular adaptive user interfaces is the radio button, subpanel pairing. Using the radio button to switch between vis displayed in a subpanel essentially allows you to make a tab control that scales with the front panel during resizing events.
I built the vi shown in Figures 1 & 2 (linked here) to demonstrate how to insert dynamically called vi’s front panels into a subpanel. In this example each radio button inserts a different 3D graph example vi into the subpanel by its reference.
Since the vis used in the subpanel are called dynamically, some extra steps may be required to build the exe. The link below shows how to build an exe that uses dynamically called vis using the application builder. I have also included some path tips that are useful when building LabVIEW executables (exe).
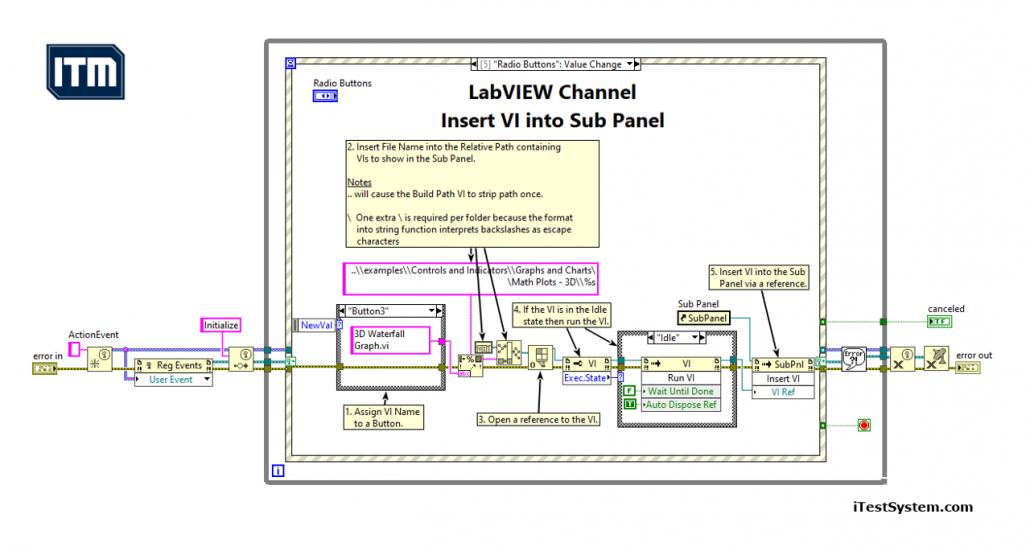
Figure 2 – Inserting a VI into a subpanel block diagram.Steps for Inserting a VI into a Subpanel
- Assign VI Name to a Button or Tree Item.
- Insert File Name into the Relative Path containing VIs to show in the Sub Panel. See Notes
- Open a reference to the VI.
- If the VI is in the Idle state then run the VI.
- Insert VI into the Subpanel via a reference.
Notes
- “..” will cause the Build Path VI to strip path once.
- \ One extra \ is required per folder because the format into string function interprets backslashes as escape characters.
You can also use a tree control instead of a radio button to control which vi is inserted into the control panel. An example of this method is illustrated in a previous blog titled “Building a Modern User Interface in LabVIEW“. The vi shown in that blog uses a similar technique for building and selecting the which vi will be inserted into the subpanel.
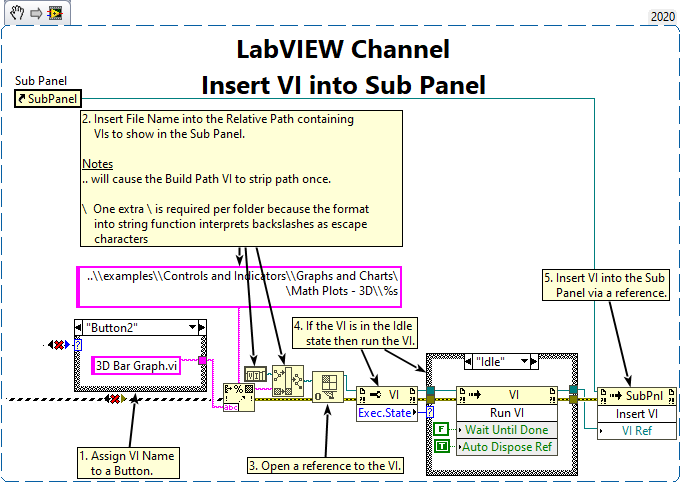
Figure 3 – Insert VI into subpanel snippet.
Figure 3 above is a vi snippet of the Insert VI invoke node for a Subpanel. If you already have a subpanel, right click on the subpanel, create a reference and wire it to the subpanel invoke node.
To learn more about subpanels, other LabVIEW programming techniques, iTestSystem or our LabVIEW programming services contact Mark Yeager @(844) 837-8797.
LabVIEW Dialog Snippet
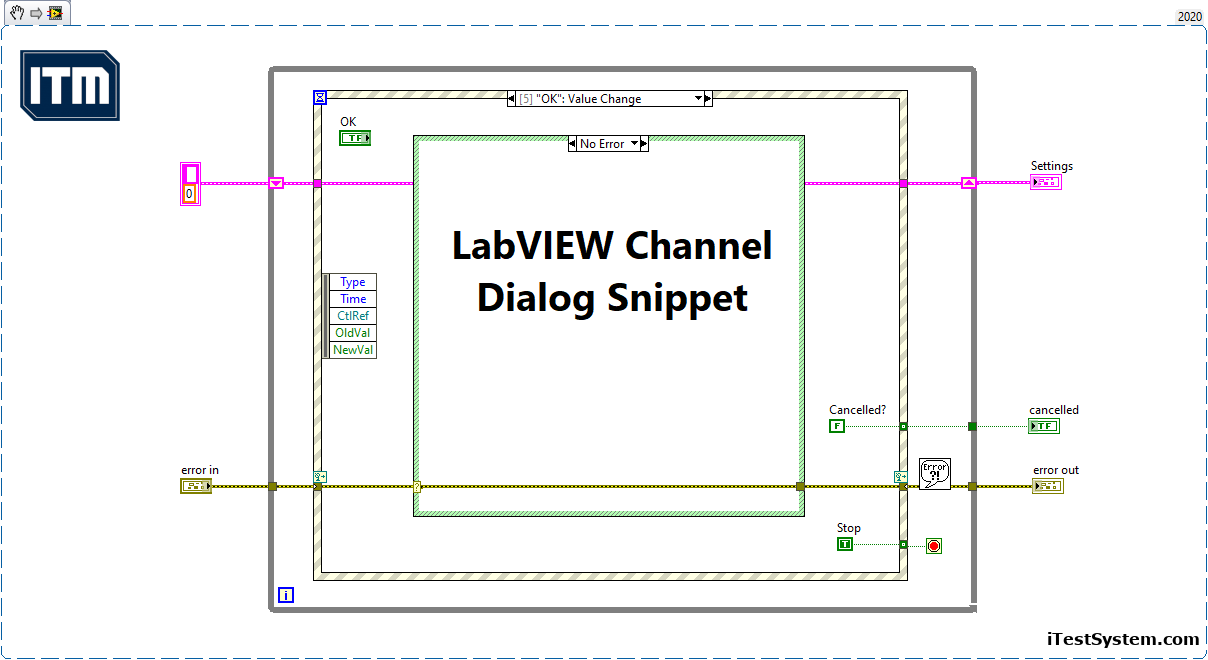
Figure 1 – Framework for Simple Dialog VI Snippet
Here is a trick for creating a simple dialog in LabVIEW. Follow these simple steps to quickly create your next dialog in less than a minute.
- Create a New VI .
- Drop the VI Snippet (Figure 1) above on the block diagram.
- Update the Window Appearance setting in VI properties to dialog (see Figure 2 below).
- Optional: Update with a Custom Window title.
- Save and run the VI.
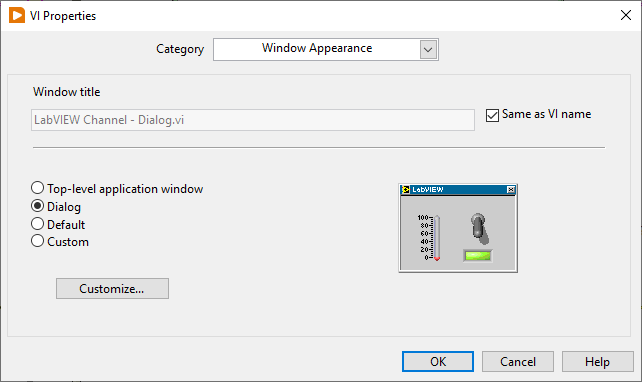
Figure 2 – VI Properties/Windows Appearance
In the dialog template snippet I also used another useful snippet – the error case structure. This simple VI snippet will help you save time with your next project.
What’s next?
Common snippets for folder creation and cluster sorting.
LabVIEW VI Snippets
If you’ve ever managed or work with a team of programmers, you realize that each person has their own programming style. If programming team members always use their own code and style, they cannot develop code effectively.
A critical practice for getting programming teams to work efficiently is code re-use. In LabVIEW there are many ways to implement code re-use. In this blog I decided to revisit one of these code re-use strategies, the VI Snippet.
What is a VI Snippet?
“VI Snippets are a way to store, share and reuse small portions of LabVIEW code. VI Snippets combine the portability of a screenshot with the functionality of a VI file by embedding LabVIEW code in a standard PNG image. When you drag a VI Snippet PNG image onto the block diagram it will drop the snippet as graphical code that can be edited and used in your application.” More on that here (Using VI Snippets to Store and Share Reusable Code Sections – National Instruments)
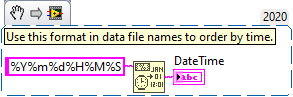
Figure 1 – VI Snippet DateTime String
Note: This image is a LabVIEW snippet, which includes LabVIEW code that you can reuse in your project. To use a snippet, right-click the image, save it to your computer, and drag the file onto your LabVIEW diagram.
Introducing Snippets in my workflow
At the surface, the Snippet is a cool way to share and reuse frequently used code. Similar to my userlib folder where I store my vi libraries, I have a folder on my computer where I catalog my snippets in subfolders (e.g. general, frameworks, arrays, tdms, SQLite, DAQmx, etc.) so that they can be located with minimal effort. Actually, I have two locations on my computer that I store snippets: A private folder that I use as my personnel sandbox and a public folder that I share with my team. As with any collaboration or shared repository, you must be discipline or you will experience chaos. Our LabVIEW development team meets weekly for code reviews, discusses new projects, and to share best practices. At the end of every meeting, we invite team members to share any new vis and/or snippets they would like to add to the team’s repository.
My first Snippet
25 years ago, when I first started wiring G code, it was not such a big deal connecting all of those wires on the Block Diagram. However, as time passes and my eyes require a bigger monitor, I look for any hack that I can muster to limit the time spent wiring clusters and arrays. To that end I offer up the prewired Bundle By Name /Array.
Figure 2 – Bundle/Unbundle/Build Array – Prewire
What’s next?
How I use VI Snippets to make quick user dialogs.
Introducing the LabVIEW Channel
I would like to introduce the ITM LabVIEW Channel, a series of blog posts related to building efficiencies in LabVIEW. In the weeks and months ahead my team and I will share past insights, lessons learned, and explore new programming concepts. This will be a sand box of sorts with a focus on solving problems using LabVIEW.
Please join us on our new LabVIEW Channel and subscribe below.
Preview What’s Next: VI Snippets
Related Links
Building a Modern User Interface in LabVIEW
When we develop LabVIEW™ applications for our customers, a common request is for a simple, resizable and intuitive user interface (UI) for data visualization. In these cases, we use a tree control and a subpanel. This type of UI functions like a tab control that automatically resizes. The main benefit of using a subpanel is to make your code more modular.

Figure 1: Modern User Interface with a Tree and Sub Panel.
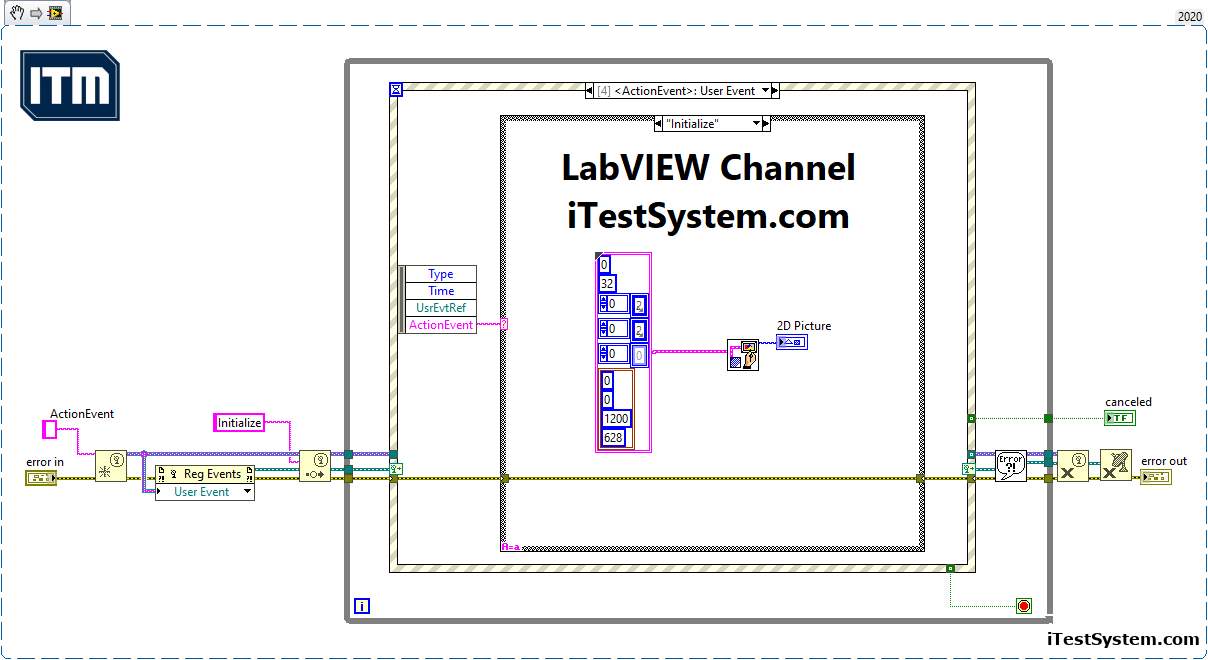
To illustrate the modularity that this type of UI creates, I made an example LabVIEW™ project. The main VI shown above uses a tree control to switch between a VI containing a graph and a VI containing a table. I used our multi-queue event architecture for VI information communication messaging. The image below shows the main VI’s significant functions.
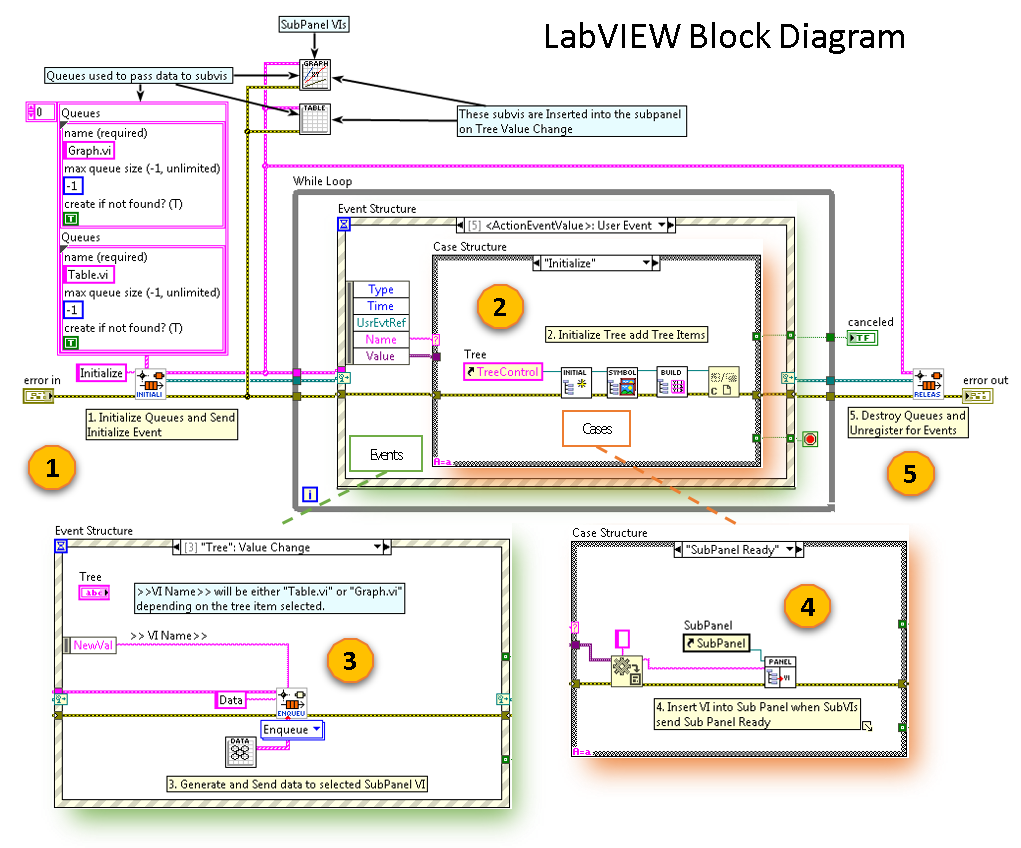
Figure 2: Main VI’s Block Diagram – Significant Functions
The main VI’s functions are listed below.
Functions
- Initialize queues and events and then generate initialize event.
- Initialize tree and add tree items.
- When a user selects an item in the tree, generate data and then send it to the subpanel VI.
- Receive SubPanel Ready event from a subpanel VI and then insert the VI into the subpanel.
- Destroy queues and unregister for events.
In this example the subpanel VIs are very simple. They populate an indicator (table or graph) and then generate a SubPanel Ready Event. The two (2) subpanel VIs and block diagrams are shown below.
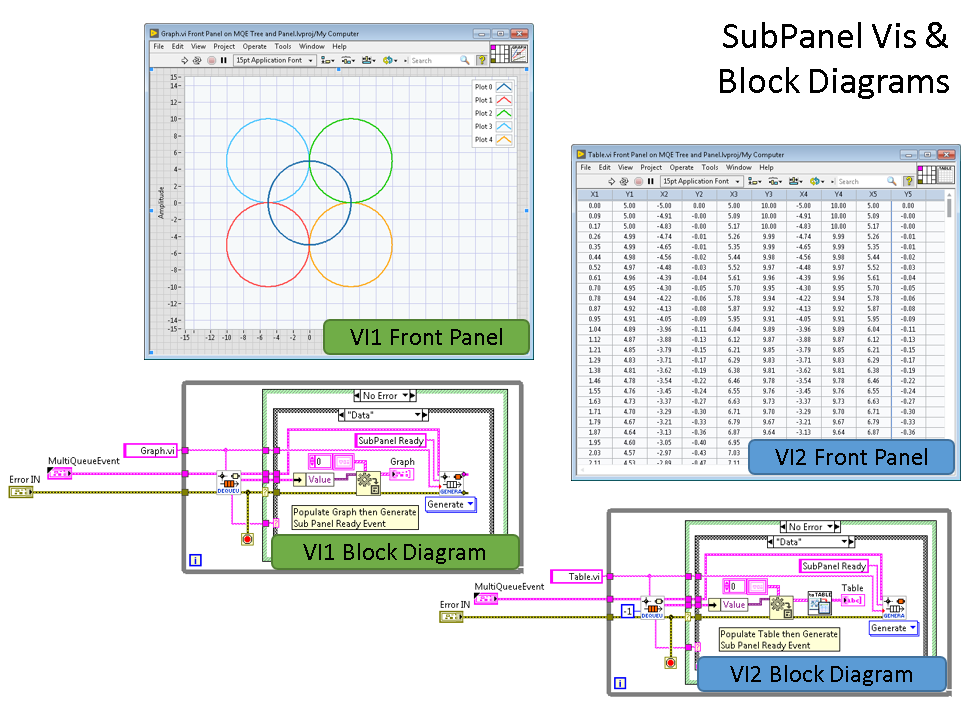
Figure 3: SubPanel VIs: Graph.vi and Table.vi
Contact Information: For more information on this example or our LabVIEW development service contact:
Mark Yeager – Integrated Test & Measurement (ITM), LLC. Email: mark.yeager@itestsystem.com or Phone: 1.844.TestSys

ITM provides software development, structural and mechanical testing services, industrial monitoring, strain gauging, and data analysis solutions to clients on six continents. ITM is a recognized National Instruments Gold Alliance Partner.
![]()